一、SuperAgent 介绍、安装使用
- SuperAgent 是一个流行的第三方 Ajax 库,专注于处理服务端/客户端的 http 请求。
- 对比现存的各种请求 API 库,SuperAgent 更加轻量、优雅、易读、易学。
- 最重要的是它可以用于 Node.js
GitHub 主页地址:https://github.com/visionmedia/superagent/
1,安装配置
下面介绍如何在 React Native 项目中安装配置 SuperAgent。
(1)在“终端”中进入项目目录,运行如下命令下载安装 SuperAgent。
|
1
|
npm
|
(2)然后在需要使用 SuperAgent 的 js 文件的头部通过 require 将模块引用进来即可。
|
1
|
var request'superagent');
|
2,简单的样例
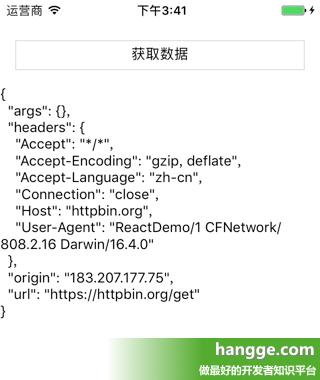
(1)效果图
点击“获取数据”按钮后,便使用 SuperAgent 发起网络数据请求,并将返回的结果显示在页面上。



(2)样例代码
|
1
2
3
4
5
6
7
8
9
10
11
12
13
14
15
16
17
18
19
20
21
22
23
24
25
26
27
28
29
30
31
32
33
34
35
36
37
38
39
40
41
42
43
44
45
46
47
48
49
50
51
52
53
54
55
56
57
58
59
|
import'react';
import
AppRegistry,
StyleSheet,
Text,
View
}'react-native';
var request'superagent');
//默认应用的容器组件
class
//构造函数
constructor(props)
super(props);
this.state
responseTextnull
};
}
//渲染
render()
return (
<View
<Textthis.doRequest.bind(this)}>获取数据</Text>
<Text>{this.state.responseText}</Text>
</View>
);
}
//开始请求数据
doRequest(){
var _thatthis;
.end(function(err,
_that.setState({responseText:
console.log(res);
});
}
}
//样式定义
const
container:{
flex:
marginTop:25
},
item:{
margin:15,
height:30,
borderWidth:1,
padding:6,
borderColor:'#ddd',
textAlign:'center'
},
});
AppRegistry.registerComponent('ReactDemo',
|
二、 基本用法
1,下面是一个简单的 Get 请求
|
1
2
3
4
|
2,使用方法字符串写法也是可以的
|
1
2
3
|
3,支持 ES6,可以使用 .then() 来代替 .end()
|
1
|
|
4,除了 GET,DELETE, HEAD, POST, PUT 以及其他 HTTP 请求都可使用
注意:由于 DELETE 是特殊的保留字段,方法命名为 .del()
|
1
2
3
4
|
5,如果是 GET 请求,可以使用下面的最简写法
|
1
2
3
|
三、请求头设置(header fields)
1,可以使用 .set() 方法单独设置每个字段
|
1
2
3
4
5
6
|
.set('API-Key', 'foobar')
.set('Accept', 'application/json')
.end(function(err,
alert(res.text);
});
|
2,也可以使用对象同时设置多个字段
|
1
2
3
4
5
|
.set({'API-Key': 'foobar','application/json'})
.end(function(err,
alert(res.text);
});
|
四、GET 请求说明
.query() 方法可以接收参数并生成查询串,同时该方法可以接收多种类型的参数。
1,.query() 方法可以接收对象类型的参数
比如下面样例最终得到的请求路径为:https://httpbin.org/get?query=Manny&range=1..5
|
1
2
3
4
5
6
|
.query({'Manny' })
.query({'1..5' })
.end(function(err,
alert(res.text);
});
|
当然把所以参数放在一个对象中也可以:
|
1
2
3
4
5
|
.query({'Manny','1..5' })
.end(function(err,
alert(res.text);
});
|
2,.query() 方法也接受字符串类型的参数
|
1
2
3
4
5
6
|
.query('search=Manny')
.query('range=1..5')
.end(function(err,
alert(res.text);
});
|
当然把多个参数字符串写在一起也是可以的:
|
1
2
3
4
5
|
.query('search=Manny&range=1..5')
.end(function(err,
alert(res.text);
});
|
五、POST/PUT 请求说明
1,JSON 方式提交数据(application/json)
(1)发送一个 JSON 字符串
|
1
2
3
4
5
6
|
.set('Content-Type', 'application/json')
.send('{"name":"tj","pet":"tobi"}')
.end(function(err,
alert(res.text);
});
|
(2)也可以发送 JSON 对象,下面代码效果同上面一样。
|
1
2
3
4
5
|
.send({'tj','tobi' })
.end(function(err,
alert(res.text);
});
|
可以多次使用 .send() 方法将发送的数据分开。
|
1
2
3
4
5
6
|
.send({'tj' })
.send({'tobi' })
.end(function(err,
alert(res.text);
});
|
2,form 表单方式提交数据(application/x-www-form-urlencoded)
(1)如果发送的是字符串,默认情况下就是使用 form 方式提交数据
|
1
2
3
4
5
6
|
.send('name=tj')
.send('pet=tobi')
.end(function(err,
alert(res.text);
});
|
(2)通过设置 Content-Type,也可以使下面对象使用 form 方式提交数据。
|
1
2
3
4
5
6
|
.set('Content-Type', 'application/x-www-form-urlencoded')
.send({'tj','tobi' })
.end(function(err,
alert(res.text);
});
|
使用 .type() 方法可以很方便地设置 Content-Type,下面代码效果和上面一样。
|
1
2
3
4
5
6
|
.type('form')
.send({'tj','tobi' })
.end(function(err,
alert(res.text);
});
|
3,POST 请求同样可以设置查询字符串
.query() 可以建立一个查询字符串,添加到链接地址后面:?format=json&dest=/login
|
1
2
3
4
5
6
7
|
.query({'json' })
.query({'/login' })
.send({'tj','tobi' })
.end(function(err,
alert(res.text);
});
|
六、设置 Content-Type
1,使用 .set() 方法进行完整设置
|
1
2
|
.set('Content-Type', 'application/json')
|
2,使用 .type() 进行快速设置
(1)该方法既接受规范的 MIME 类型名称。
|
1
2
|
.type('Content-Type', 'application/json')
|
(2)也接受简单的扩展名称,比如:xml、json、png 等等。
|
1
2
3
4
5
|
.type('json')
.type('png')
|
七、自动重新请求
使用 .retry() 方法,当请求失败或网络异常时,会继续尝试再次请求。
该方法可以设置最大尝试次数(失败次数),默认值为 3。
|
1
2
3
4
5
|
原文出自:www.hangge.com 转载请保留原文链接:http://www.hangge.com/blog/cache/detail_1622.html